Thursday, April 29, 2010

Save Your Sole!!

At some point in our lives we feel that hope might be lost forever. That the path we have chosen, might have left our sole in poor shape. Well not to worry, it can be repaired. No I am not a priest, nor will I direct you to your local place or worship. Instead, simply head out to the garage with your damaged sole and let's get to work.

The sole in question today is from a pair of The North Face approach/bowling/hipster shoes (not mine, I would never wear faux bowling hipster shoes). The heel area began to peel away from the foam shortly after they were new. Though not terminal, it was annoying for the owner.

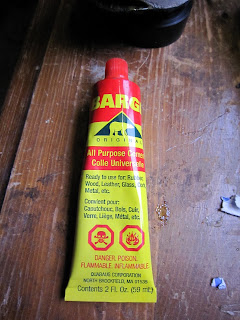
The secret to shoe repair is choosing the correct type of adhesive. After all the only thing that is really keeping your sole in place is the glue! Ok, some boot soles are glued, stitched, and sewn in place. I have attempted to repair this sole one epoxy night, however epoxy is not the right type of glue. It is too stiff and does not flex with the rubber and foam. Without the ability to conform is breaks its bond between the two surfaces. Instead Barge Cement should be used when making sole repairs.

First thing to do is to remove as much of the old glue as possible. Next wash the two surfaces that you are planning to glue. Apply the glue to both sides, allow to dry and "tack" up, 10-15 minutes depending on air temperature. My garage was close to freezing and required about 25 minutes before the glue would tack up. Press the two surfaces firmly against each other, wiping off any excess glue which might ozzzes out.


Here is the trickiest part. Since the two halves do not want to stay together on their own, you need to apply pressure till the cement is fully cured. Holding the soles of these shoes together for 12 hours was not an options. With this type of thing, I usually use clamps or weights. However in this application neither of those options would have worked out. The curves surface needed varying degrees of force applied at different angles. The solution: TAPE. I used electrical tape and "tape the hell out of" the sole. Seemed to work out pretty good. I left the shoes in this state for two days before removing the tape and returning them to their owner. I do not think that this was nessary, just happened that way.


And there you have it, another sole saved!!


Thursday, April 15, 2010

09-10 Ski Season BackCountry Set Up

Though the 2009-2010 ski season is almost over. The Back Country ski season is under full swing. This year, I changed my BC ski set up almost completely. With my annual spring overnight ski trip coming up, a bit of fine tuning of ski gear is happening. What better time to showcase my set up than now.
Skis-2005 Salomon 1080, 171 cm

Bindings-2010 G3 Onyx

Boots-First Gen Garmont Mega Ride
Skins-Black Diamond guild light 80mm with twin tip tails

Ski Crampons- B&D 80mm with F1 style post

Poles- Komperdell flick lock carbon 2 piece

Wednesday, April 14, 2010

Moto Stand

There comes a time in every motorcycle riders life when you need to lift your bike off the ground. This can be accomplished in many different ways. Built in center stands, rear wheel lifts, motorcycle specific lifts, milk crates, paint buckets, lift slings, moto-jack stands http://mrpulldown.blogspot.com/search/label/DR350.

Tired of all the make shift methods, I finally got myself a real moto stand. It helped that I did not have to drop big dollars on one. http://www.harborfreight.com/cpi/ctaf/displayitem.taf?Itemnumber=66552 $29.99

The lift mechanism requires me to stand on the lift pedal to lift my 300lb ish DR 350. The bike is still more or less balanced on the stand, so beware of the bike shifting and falling off it you remove a large amount of weight suddenly; like removing a wheel. Before buying check that the height of the stand will work for your bike. With mine, it was a little tall. I need to rock the bike slightly up on its kick stand in order to get the lift stand to slide under.


Another method that works well is a floor jack and a piece of 2x6".

Tuesday, April 13, 2010

The Cove - Not Knowing Is So Much Easier


So much media attention has been given towards the hunting to whales by the Japanese lately that it is common knowledge. However a news headline has so little information. Recently a documentary movie has been getting alot of media attention, yet it is still relatively unknown to the main stream public. Across the nation this film seem to snatching up awards at film festivals. I knew it was about some ill fated dolphins, but till last night I had no idea the depths of the subject.

Sometimes not knowing is easier than knowing. And now that I know I feel obligated to do something about it.


At the very least I will make a contribution http://www.takepart.com/thecove

I under stand now Bob Barker!

Friday, April 9, 2010

Leaking Air Compressor - Check Valve Repair

This last summer I rebuilt my deck. A friend of mine came over to help install some seismic reinforcements. This included a bracket which tied the deck to the house. The bracket was held in place with many Simpson SDS screws. Since the bracket was located between a set of joists, space was limited when selecting which tool was to be used to drive the screws. Cranking each of the screws by hand with a ratchet was too labor intensive. The solution was a pneumatic ratchet. Pneumatic ratchets however use alot of air. While driving all the screws in, my air compressor must have continuously ran for 30-45 minutes. After this particular job my air compressor developed a slow air leak. Though not terminal, this leak was annoying. Not only was there a constant high pitched hiss, but the compressor would fire up often, even when not in constant use as it would keep the pressure in the holding tank to level.


What I suspect had happened was the prolong running of the compressor overheated a component, most likely one of the valves. So I decided to investigate. At first pass it appears that the unloader valve was leaking. This is a mechanical valve located in the electrical switch area. The valve is a pneumatic/mechanical valve that triggers the electrical switch to turn on, when it senses low pressure. Though leaking, this valve what not the culprit.

Pressurized air is supply to the storage tank through a feed line. This feed line enters a check valve prior to the storage tank. Though it looks like air from the compressor enters the check valve, from the thick brass line, then goes out through the smaller line; the check valve is actually a three way valve with air entering the storage tank at the base of the valve. The thin brass line goes to the unloader valve mentioned earlier.


By removing the cap on the end of the check valve the inside working can be removed. Check valves are relatively simple; consisting of a spring and rubber cap, or seal. The picture of the check valve spring is not the same type as the one I took apart. It is simply there to show the basic make up of such a valve. The overheating of the check valve, over heated the spring. Like taking a torch to your cars suspension coil springs to lower your ride. The heating of the spring weakened it to the point that it no longer sealed the pressurized air from the tank. The air would leak back through the check valve and would enter both the compressor and the unloader valve. That is why at initial inspection it appeared that the unloader valve was leaking.

The proper repair for this job would have been to order a new spring and possible a new sealing cap. However I simply pulled the existing spring apart and stretched it out. This increase in spring tension was enough to return the check valve to full functionality. Though this type of cold working of the spring metal is not recommended, this is a low risk part. If it fails again, I might consider a new spring.


As my friend's grandpa once put it, "Good enough for the girls we go with!"