Friday, January 29, 2010

Lowe Hummingbird - A skiing Ice axe for hard snow and neve

Ice axes are meant for just that: ice. However that is not what always covers the ground in the winter. Often times the slope or chute you are climbing is covered with hard snow, or neve. This is especially true if you are looking to ski down the same slope you just climbed up. Such conditions are difficult for a standard ice axe to gain a good purchase. The relatively thin blade of an ice axe cuts through the snow like a knife. A cold dull knife blade, but a knife never the less. Because of this fact the tube pick was invented. Rather than the standard ice axe blade, the pick of a "snow" axe has a semi circle cross section. This half moon shape has a much greater cross sectional area to hold the snow.


I recently came across this particular axe: the Lowe Humming bird. This is a very versatile axe and can be configured for many conditions. The configuration which I received the axe in is quite unique. It purpose: to climb snow. Not only does it have a tube pick on one end, but a extra large tube pick for an adzes. This is something I have never seen before, and I have seen my share of ice climbing tools. The axe appears to be a hammer only axe, without the option of switching to an adzes. An adzes is flat blade used to chop steps in the ice. Ice axes are often constructed so that both the pick and the hammer can be removed and replaced with another type of pick or an adzes. If this option is not present, most likely there is another version of the axe with a forged adzes.


It then begs the question, is this an adzes attachment or an extra large tube pick attached to the axe's hammer. I would imagine that it is in fact an extra large tube pick for the following reasons. The full circle design of the piece in question would hold the snow in place. If it was intended to be a chopping tool it should be destined to be self clearing. Sure a second "chop" would drive out the snow lodged in by the first bite. However this is a small amount of snow taken with each bite. No very efficient for making steps. Next the short shaft design is intended for vertical or steep travel. In the steeps, crampons are a necessity and thus negates the need for steps. Finally chopping steps is an old mountaineering technical. One would chop steps if they are not wearing crampons, on low angle and/or if they are marking trail for others to follow. If any of those conditions were true one would be using a longer mountaineering axe rather than a short climbing tool.


If you ever find yourself out on a steep snow field, and your ice axe isn't cutting it, or it is in fact cutting through the snow; know that there are specific built ice tools for climbing the NEVE!

Wednesday, January 27, 2010

Skiing In Shorts

For most of us, the first thing we do in the morning is to stumble to our closet and pick out some clothes to put on. OK maybe a trip to the potty and the coffee maker might beat out getting dressed. But sooner or later we got to chose what we will layer our bodies with for the day.

If this is a ski day you might take a look outside to see what the weather might be. Many options exist for your upper body. However your choices are limited when it comes to your legs. If it is warm, you might wear ski pants only. If it is cold you might throw on a pair of long johns underneath. What if it is kindda cold, or really cold. I often ski in a pair of shorts.


No I am not talking about those bone heads you might see out on a spring ski day sporting a Hawaiian shirt and shorts. I am talking about adding a pair of shorts to your layering system. In the winter many of us put away our summer clothes and pull out the winter garb. Included in this change out are most of our shorts. After all you most likely will not be able to wear them for six months or so. Shorts for summer, pants for winter. Whoever shorts make for a very good layering system. On those kinda cold days I will throw on a pair of shorts underneath my ski pants to give me a little more insulation. Short pants are great for this cause they insulate your butt and thighs but do not interfere with ski boots. On very cold days I will add a pair of shorts on top of my long thermal pants to add another layer to my system.


The shorts of choice for me are synthetic "basketball" shorts. Not too short, not too long. Synthetic material that does not get clammy when wet. Silky smooth so that it slides between the layers. No cargo pockets to bunch up and cause extra bulk. Does not limits a full range of motion. And very inexpensive. Who says all ski stuff cost a lot.
Yes I ski in shorts. The Hawaiian shirt however, we'll save that topic for another post.

Tuesday, January 19, 2010

Romanesco Broccoli - Trippin out on Vegies


I just came across a picture that I thought was an alien life form. Turns out it is just broccoli. Actually it more resembles cauliflower and is also know as a Roman Cauliflower. If the shape is familiar that is because each of the buds are arranged in a logarithmic spiral. Log Spirals are often found in nature. Way to make eating your vegetables fun.

Pozi Drive - Phillips not GM

By now you have probably figured out that there are different size Phillips screws and bit. Good Job. But did you know that there are more than one type of Phillips screw and drivers.

If you are a ski bum you know that a #3 Phillips screw driver is best for turning those large screws on your skis. Be it the DIN setting or the mounting screws. If you have a keen eye you might notice that the face of the screw might have a few extra lines than the standard four found on Phillips screw head. Four standard slots and four additional "star burst" set of 45 degree angles. This is known as Pozi Drive or Suredrive screw.


A joint patent for this design is held by the Phillips Screw Company and the American Screw Company. The purpose of this screw is to increase the torque which can be applied before the screw and driver interface "slips".


A regular screw driver can be used to turn Pozi screws however a Pozi driver should not be used to turn non-pozi Phillips screws. The four extra spline will prevent the pozi driver from sitting properly with in the screw and cause rounding of the four Phillips slots.

The term Pozi Drive is often confused with Posi-Trac. Posi Trac is General Motor Companies term for a limited slip differential. LSD not the screws on your skis.

The American Screw Company...Imagine all the marketing material you can come up with for those guys!

Wednesday, January 13, 2010

Hand Warmers - Part 1 Disposable Chemical Heaters

If you have spent any amount of time outdoors in the winter, you most likely know of a little wonder called a hand warmer. Rip open a packet and these little babies get toasty hot. Stick them in your pocket or glove, rub them all over your body. Sometime when you are chilled to the bone there is no way to get warm but to add additional heat to your body.


Though I do not use them on a regular bases I keep a few in my ski bag; just in case. The temperatures around here are relatively mild and dressing appropriately usually keeps me warm enough. However when the temps drop to close or below Zero these puppies can really save your skin.


Over the years I have learned a few things about hand warmers that you might not know. Tips on how to use them and ways to make them more effective. There are also several different types of warmers that I will share in following post.


Chemical type hand warms are made by many different companies. They also come in various different forms, such as toe, foot and sleeping bag warmers. These type of chemical heaters are activated by oxygen, once you open the package, the heater is exposed to air and a reaction begins. When the reaction is done, the warmer becomes hard.


-Since warmers last for many hours (7 hours according to some packages), and your outing might not, you can save your hand warmer by placing them in an air tight zip lock baggy. This will stop the chemical reaction. You can then save the heater for the next time you need it again. Make sure to suck all the air out of the bag before you seal it.


-when buying heaters, give the packet a squeeze. The material in the packet should be loose, like a bag of sand. Often the outer wrap develops a hole, and the warmer becomes activated and is already spent even before you get a chance to use it. Also check it before you pack a warmer with you off on your adventure. It is a real bummer to have an ineffective warmer to fall back on.


-some gloves have little zippered pockets. These are for your hand warmers to be placed in. Very effective.


-Skiing is the only time that I have needed toe warmers. In fact toe warmers are so effective that I have never needed foot warmers. Toe warmers are triangular shaped warmers that have a sticky pad on them. The directions tell you to stick the pad on the foot bed of your boots. I have found that placing them on the foot bed negatively effects the way you ski or walk. Instead place them on top of your toes. There is usually space in your boot above your toes to spare. This also makes is easy to insert and remove.
-Since the warmers need air to heat, sometime they become oxygen starved and do not produce the optimal heat output. Glove pockets and zipped up pockets often do not have enough air flow. Remove the warmers from your pocket if you suspect that they are not working effectively and give them a shake and replace. You might get a little more juice out of them.

Saturday, January 9, 2010

Subi Skid Plate Part Deux - Access Holes

It's winter time and our trusty 2000 Subaru Outback is out doing full time transport duties. With the added mileage the inevitable oil change was needed. Oil changes on subi's are very easy. That is if no splash shield or skid plate is present. However several years ago I added an aluminum skid plate to replace the decrepit plastic/cardboard splash shield. Now oil changes are a nightmare.

mrpulldown.blogspot.com/2009/06/subaru-skid-plate-one-tough-subi.html

Of course it doesn't have to be. I brought it upon myself, by purchasing a skid plate with no access holes (oil drain and filter access). The thought was that it would protect the oil pan a little better. What I should have realized is that this is a grocery getter and not a Dakar Rally Car.

So with this most recent oil change, I dropped the skid plate, changed the oil and filter, and before I reinstalled the plate I drilled a couple of access holes. The following is my account:
Dropping the skid plate is easy. Air tools are a must. The five supplied bolts have long threads and manually turning wrenches overhead is best left for those with Popeye like for arms. I drove the car onto ramps to gain a little more clearance to work under. Next take your trusty floor jack and place the jack pad in the center of the plate. No need to jack the car up, just make contact and give it another half pump to insure that the skid will be held in place when you remove the bolts. Get that air ratchet and a 13mm socket. Remove bolts and lower the plate.
I wrote Paul of Primitive Racing asking for the exact location of the holes. The dimensions he reported to me are as follows:

Drain ~2.5" hole location is 4.4" up (towards front) from center of the OUTER of the 2 rear mounting holes (elongated hole, measure from center) and 2.2" out (towards outer edge of plate on passenger side. So 4.4 up and 2.2 over.
Filter ~4.25" hole (2.5" hole then jigsaw or find a 4.25" hole saw) location is 8.9" up from the center of that same mounting hole and 4.9" out. So 8.9" up and 4.9" over.


At the end of the e-mail he says that I should verify these dimensions for myself. In doings so I decided to make a few adjustments from Paul's dimensions.


5 up and 2 over for the drain, and 9.5 up and 5 over for the filter.


Using a square I laid out the approximate location of the my holes.


I had purchased a hole saw kit from my favorite tool store many months ago in anticipation of this project.


Though this one would have worked as well.
http://www.harborfreight.com/cpi/ctaf/displayitem.taf?Itemnumber=36222

For $5.99 I did not expect very high quality, all I needed was two holes cut. The kit however did not come with a 4.25" hole saw. Instead I used a 4" and it seemed to work fine.


Laid out the hole saws on the skid. That is what the end product should look like. Looks about right.


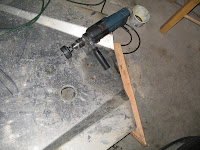
Assemble the hole saw. And chuck it up in your most powerful drill. Go for a corded one rather than a cordless. Even though the quality of the hole saw kit is low, high speed steel should cut through aluminum no problem. The danger is shock loading the saw and breaking teeth off. Use cutting oil (motor oil works fine) and go slow. Periodically check the tightness of the hole saw to the arbor, and the drill chuck, for the vibrations will loosen things up. In fact I broke on the of the drive pegs cause things loosened up on me and I did not notice. Make sure to elevate the work piece so that you do not grind the center drill of the hole saw assembly into the ground.

The 4 inch hole is much more difficult to cut than the 2.5". Go slow, use oil, and re tighten the hole saw assembly.

Now that you have your holes cut you are not out of the woods yet. You have the reinstall the skid plate. This is by far the most difficult part of the job. The first hurdle in this task are the two spacers for the rear of the mounting holes. The skid plate did not come with them. I found that without these the oil pan will bump the skid when the engine torques. Maybe my engine mounts are worn out. I used two large nuts as spacers. The nuts are approximately 1/2" thick. They are large enough to easily allow the mounting bolts to pass through. Since spacers tend to move around and cause grief when lining up all five holes and bolts, I opted to glue them in place. With the spacers glued in place I lifted the skid plate up to the car using my floor jack. Fiddle with the mounting bolts till all five bolts are engaged. Once all the bolts are engaged, begin to drive them in a little at a time. Do not drive one bolt all the way down while the others are still slightly engaged. This will cause the plate to not mount flush and exert unnecessary lateral loads on the bolts and possibly bungle up the threads in the hole.


And there you have it. One skid plate all mounted up with access holes.