mrpulldown.blogspot.com/2009/06/subaru-skid-plate-one-tough-subi.html
Of course it doesn't have to be. I brought it upon myself, by purchasing a skid plate with no access holes (oil drain and filter access). The thought was that it would protect the oil pan a little better. What I should have realized is that this is a grocery getter and not a Dakar Rally Car.
 So with this most recent oil change, I dropped the skid plate, changed the oil and filter, and before I reinstalled the plate I drilled a couple of access holes. The following is my account:
Dropping the skid plate is easy. Air tools are a must. The five supplied bolts have long threads and manually turning wrenches overhead is best left for those with Popeye like for arms. I drove the car onto ramps to gain a little more clearance to work under. Next take your trusty floor jack and place the jack pad in the center of the plate. No need to jack the car up, just make contact and give it another half pump to insure that the skid will be held in place when you remove the bolts. Get that air ratchet and a 13mm socket. Remove bolts and lower the plate.
 I wrote Paul of Primitive Racing asking for the exact location of the holes. The dimensions he reported to me are as follows:
Drain ~2.5" hole location is 4.4" up (towards front) from center of the OUTER of the 2 rear mounting holes (elongated hole, measure from center) and 2.2" out (towards outer edge of plate on passenger side. So 4.4 up and 2.2 over.
Filter ~4.25" hole (2.5" hole then jigsaw or find a 4.25" hole saw) location is 8.9" up from the center of that same mounting hole and 4.9" out. So 8.9" up and 4.9" over.
At the end of the e-mail he says that I should verify these dimensions for myself. In doings so I decided to ma ke a few adjustments from Paul's dimensions.
 ke a few adjustments from Paul's dimensions.
 5 up and 2 over for the drain, and 9.5 up and 5 over for the filter.
Using a square I laid out the approximate location of the my holes.
I had purchased a hole saw kit from my favorite tool store many months ago in anticipation of this project.

Though this one would have worked as well.
http://www.harborfreight.com/cpi/ctaf/displayitem.taf?Itemnumber=36222
For $5.99 I did not expect very high quality, all I needed was two holes cut. The kit however did not come with a 4.25" hole saw. Instead I used a 4" a nd it seemed to work fine.
 nd it seemed to work fine.
 Laid out the hole saws on the skid. That is what the end product should look like. Looks about right.
Assemble the hole saw. And chuck it up in your most powerful drill. Go for a c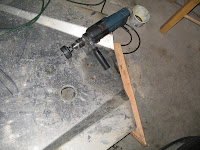 orded one rather than a cordless. Even though the quality of the hole saw kit is low, high speed steel should cut through aluminum no problem. The danger is shock loading the saw and breaking teeth off. Use cutting oil (motor oil works fine) and go slow. Periodically check the tightness of the hole saw to the arbor, and the drill chuck, for the vibrations will loosen things up. In fact I broke on the of the drive pegs cause things loosened up on me and I d
 id not notice. Make sure to elevate the work piece so that you do not grind the center drill of the hole saw assembly into the ground.
 orded one rather than a cordless. Even though the quality of the hole saw kit is low, high speed steel should cut through aluminum no problem. The danger is shock loading the saw and breaking teeth off. Use cutting oil (motor oil works fine) and go slow. Periodically check the tightness of the hole saw to the arbor, and the drill chuck, for the vibrations will loosen things up. In fact I broke on the of the drive pegs cause things loosened up on me and I d
 id not notice. Make sure to elevate the work piece so that you do not grind the center drill of the hole saw assembly into the ground.
The 4 inch hole is much more difficult to cut than the 2.5". Go slow, use oil, and re tighten the hole saw assembly.
Now that you have your holes cut you are not out of the woods yet. You have the reinstall the skid plate. This is by far the most difficult part of the job. The first hurdle in this task are the two spacers for the rear of the mounting holes. The skid plate did not come with them. I found that without these the oil pan will bump the skid when the engine torques. Maybe my engine mounts are worn out. I used two large nuts as spacers. The nuts are approximately 1/2" thick. They are large enough to easily allow the mounting bolts to pass through. Since spacers tend to move around and cause grief when lining up all five holes and bolts, I opted to glue them in place. With the spacers glued in place I lifted the skid plate up to the car using my floor jack. Fiddle with the mounting bolts till all five bolts are engaged. Once all the bolts are engaged, begin to drive them in a little at a time. Do not drive one bolt all the way down while the others are still slightly engaged. This will cause the plate to not mount flush and exert unnecessary lateral loads on the bolts and possibly bungle up the threads in the hole.
And there you have it. One skid plate all mounted up with access holes.
No comments:
Post a Comment