Tuesday, December 29, 2009

Kamik Pariots - The hi performance winter boot


There are people who like cold weather. However I have never meet anyone who likes having cold feet. During the winter months it is rare to see me outside in anything but ski boots or some kind of waterproof insulated winter boot. Last winter I had a write up about my Sorel 1964 Pac Boots.
These however are not the only pair of winter boots I own. My other winter boot are a pair of Kamik Patriots.


Kamik is a boot/shoe manufacture from our neighbors of the frozen north: Quebec Canada. Though you might not have heard of them, Kamik's parent company Genfoot Inc. was established in 1898; so they know a thing or two about making shoes.

When my old Sorels died (not my current 1964's), I decided to replace them with a pair of boots that are a little more high performance. The primary difference between this boot and a pair of Sorel type pac boot is the double boot aspect. Pac boots are double boots; meaning there is an inner liner/insulating boot, and an outer waterproof shell. The Kamik Patriots are not such a boot. The insulation is built into the walls of the boot. The result is a much better fitting boot; one which I can take long hikes or snow shoe without heel slip or fear of blisters. The Thinsulate Ultra insulation provide thermal protection down to -58 degrees F. Because of this single boot design, it is difficult to dry the inside of the boot. Remember that the average foot produces a pint of sweat a day. Airing the boot out is acceptable in drying them, however prolonged wear would result in clammy boots. A forced air or heated boot dryer is good to have/use if you were to use these boots all day, everyday.

The lacing system resembles that of a hiking boot. The four sets of corrosion resistant pivoting lower eyelets provides smooth lacing action and distributes the lace tension evenly over the forefoot. The center lace lock grab the shoe lace firmly and resist slipping. The upper speed hooks cinch the upper cuff tightly and seals out snow. The length of shoe lace provided however is ridiculously long. This isn't a big deal but very annoying since you will not be replacing new laces for your new boot, and trimming them will caused frayed ends.

Other features of this boot includes an anti bacterial foot bed, to help keep these boots smelling fresh after many pints of foot sweat. A large kick tab in the rear of the boot is effective for quickly kicking off your boots after a long work or play day. This tab also doubles as a retainer for snowshoe straps or similar, however it does not work as the rear latch tab of a pair of semi automatic crampons. The boot tongue is not connected to the rest of the boot at the top lace hook portion. This is in my opinion more of a benefit than a hindrance. Since this is a tall boot, the separated tongue allows an easy entrance of your foot. If the tongue is attached it would makes it difficult to get the foot in. If the tongue connecting material is made larger, to allow for easier ingress, the material would bunch up when the boot is fully laces. Because of this tongue separation, the boot is not waterproof to the top of its 10 inch cuff. If one steps into water above the lace lock, water will seep in. For me this is acceptable. After all these are snow boots and not waders. This tongue design also helps open the boot up to allow for improved air circulation to aide in drying.

My relationship with my Kamiks have not always been peaches and roses. When I first received my boots I noticed how stiff they were. Rather than being constructed of rubber, the lower portion of the boot appeared to be made of plastic. Squatting down would create a dramatic crease along the boot which would press onto your foot. This is the same crease that happens when you walk. With the lower section being so stiff this crease soon turned into a crack, which would let in moisture. This crack did not happen immediately but over a season of heavy use. I was very disappointed. With my recent experience with poor boot durability I was not looking forward to going through the warranty process. http://mrpulldown.blogspot.com/2009/09/trezeta-epic-boot-failure-part-ii.html


To being my warranty process I e-mail Kamik's customer service. They instructed me to ship in my boots. If they found them to be defective they would replace them. I did so, and after a week received an e-mail stating that a new pair of boots were in the mail to me. After another week I received a new pair of boots. WOW that is some customer service!! They did not hassle me, ask for purchase information, they just took one look at the boot and said, "that shouldn't happen", and replaced them. My new boot, though seemingly identical, has a rubber lower portion which will resist cracking.

By doing me right, some would say that I should fully support Kamik and not mention this transgression. However I think that this is an actual plus for the company. As I have said before: all products fail. What separates a good company from a bad one is their willingness to stand behind their products, and not to let the customer pay for their mistakes. In the future I will not hesitate to purchase another Genfoot INC. product.

Monday, December 21, 2009

2002, VW Eurovan Camper, $38,000

Update: After weeks of listing and many potential buyers, we took the camper off the market. We found that it was just too dear to us to get rid of. Sorry to the buyer that we pulled deal out from. And FYI $38,000 was a deal. Serious buyers that have been search for a camper like this were glad to pay that or more. Looks like there will be many more eurovan trips in the future.

Have you always wanted a VW pop top van, but didn’t want to deal with a slow hippie death box? Then this van is what you have been looking for. Modern styling, engine, and dual air bags. The VR6 motor pumps out 201 horse power, while getting 22 mpg on the highway. Only the 2001 to 2003 (last year) VR6 made 201 hp, the earlier years only made 150hp. This has been a great family van. However it rarely gets used anymore and I feel that it would be better if used by someone for its intended purpose as a camper rather than sitting in the garage. We bought this van new in 2002, and are the original owners. The first week of owning it, we had a set of custom seat covers made for all the seats. Thus the upholstery is in perfect condition. All service has been performed by our local VW dealer, with all service records available. Even oil changes and new tire were done at the dealer. This thing has been garage stored its entire life.

There are so many features on this camper that I have listed them in the chart below. A few of the highlights are: pop top bed, stove, frig, sink, thermostat controlled furnace, propane tank, fresh water storage tank, grey water tank, lower level bed (yes that mean a guest bed room), removable center bench, dual removable tables, new 2nd RV battery.

Things that I personally love about this van: Drives like a car, yet it is a camper. Despite the camper aspect, it is still a van and can haul a ton of gear. You can load several full size sheets of 4x8 plywood in it, though I have never tried. Did I mention it is fast!!

The camper currently lives in Ventura California. Please contact me for any questions or to set up a test drive and viewing.


Automotive Equipment
-In-dash air conditioning (CFC-free)
-Front and rear heating systems
-Power front windows with one-touch-down
-Power door locks (including side door and rear hatch)
-Cruise control with resume
-AM/FM/CD Sony Xplod stereo with six speakers
-Intermittent windshield wipers
-Beverage holders
-Interior lighting, front cab area and side entrance
-Power outside mirrors with electric defrost
-Rear hatch wiper and defroster


Technical Information
-2.8-liter, 6-cylinder VR6 engine
-Peak horsepower: 201 @ 4,500 RPM
-Peak Ft/lb. torque: 190 @ 3,200 RPM
-Towing capacity: max. 4,400 lb. braked trailer
-4-wheel disk anti-lock braking system
-Daytime running lights
-Front-wheel drive
-Fog lights
-Fully independent suspension, front and rear
-4-speed automatic transmission
-Low-speed Traction Control System
-Reinforced floor panels, B and C pillars
-Height-adjustable head restraints for each passenger
-Side impact beams in front doors and sliding door

-Child safety lock for sliding door
-LP gas and carbon monoxide detectors
-Fuel-tank capacity-21.1 gal
-22mpg highway, 17mpg city
-Front-wheel drive with 16" all-season tires
-Power-assisted rack-and-pinion steering
-Fully independent suspension, front and rear
-Power-assisted brakes with load sensor
-Four-speed automatic transmission
-Four-wheel anti-lock braking system

Camping Supplies
-Front seats swivel 360 degrees

-AC/DC/LP gas refrigerator (2 cu. ft.)
-Two-burner LP gas stove with stainless steel splatter shield
-Stainless steel sink and counter top
-2 Dining/utility tables
-Auxiliary deep cycle coach battery (130 amp/hour rating)
-AC-to DC power converter with coach battery charger
-Two 110-volt outlets, two 12-volt outlets
-LED monitor panel for water tanks, LP gas and coach battery
-Fluorescent lights over gallery and lower bed
-Incandescent light for upper bed

-Driver-side tip-out screened window
-Passenger-side sliding screened window
-Room darkening, pleated blinds for side windows

-Privacy curtains for front cab and rear hatch windows
-Tip-out roof vent
-Auxiliary water sprayer at rear hatch
-Marine grade vinyl flooring rear of driver's cab
-Optional 12,000 BTU forced air furnace


Safety Features
-Dual airbags.
-Height-adjustable three-point belts for front seats
-Height-adjustable head restraints for each passenger
-Energy-absorbing steel frame with additional deformation element
-Energy-absorbing steel body panels welded to a steel "safety cage"
-Side impact beams in front doors and sliding side door
-Dual diagonal braking circuits with Load-sensitive Braking System
-High-mounted brake light
-Child safety lock for sliding side door
-Shift Lock III (automatic transmission)
-Safety fuel tank
-LP gas and Carbon Monoxide detectors
-Ground Fault Interrupt (GFI) protection on 110-volt outlets


Storage Tanks
-21.1-gallon gasoline tank
-12-gallon fresh water tank
-8-gallon "gray" water tank
-5.9-gallon LP gas tank

Dimensions Camper
-74"x43"bed for two in the pop-up roof
-Rear bench unfolds in to a second 84"x43" bed
-Length 17'
-Exterior height 6'5"
-Exterior width 6'3"
-Interior height 7' with top up
-Interior width 5'5"
-Curb weight (lbs.) 5,106
-Wheelbase 115"

Storage Areas
-Wardrobe closet with sliding door access-37" tall, 28" wide, 15" deep
-15 cu. ft. of enclosed cabinet space (including wardrobe)
-20 cu. ft. of storage behind and under the rear bench

Seating Comfort
-Two full-swiveling front captain seats with adjustable armrests
-Three-person rear bench
-Two-person center bench that faces forward or rearward
-Driver and passenger door storage pockets
-Netted storage pockets in rear hatch area
-Silverware drawer
-Roof-top luggage carrier with tie-down bars
-Center and rear benches are removable without tools

Thursday, December 10, 2009

Winter Wiper Blades - More going on then you thought

As winter rolls in, I perform a series of winterizing steps for the car. Switching out to winter tires, filling the windshield wiper fluid reservoir with freeze resistant wiper fluid, placing rubber floor mats. Those all seems like sensible things to do. However another thing that I do is switch out windshield wiper blades. WHAT!? That's right windshield wiper blades. Ok for my wife's car I insensibly put on a warm fuzzy seat cover and steering wheel cover.


A windshield wiper consist of several arched springs and a rubber blade. The arches maintain constant pressure on the rubber blade against the windshield. If a section of spring arch is compromised it no longer pushed the rubber squeegee against the glass and a streak will form. During a winter storm as snow falls on you wiper, it fills the arches and prevents them from working. The solution: winter wiper blades.


Traditionally a winter wiper blade is constructed the same as a typical blade with one added feature: a love glove. The winter blade is covered with a thin flexible rubber jacket that prevents the snow from binding up the spring mechanisms of a standard wiper blade. Often times the end of the blades are capped with a red tip. This either helps identify that that are winter blades or to help locate the end of your wipers when scraping ice off your windshield. Does it work. They sure do. One thing however is that you can not replace just the rubber insert of a winter blade. Everything is covered. However these days it is almost impossible to find blade refills only. Most auto parts store only sell the entire arch assembly.

So why do I go through the trouble of switching out my wiper blades. The main reason is because I still have my old blades and want to use them up. Winter blades also cost a bit more then your standard blade so I rather save the hi performance blade for the winter when they are really needed. The summer sun really does a number on the rubber. When my other set of blades eventually wear out I will most likely just keep the winter type blades year round.

Recently a new type of wiper blade has come on the market. I refer to them as the curved beam type blade. This type of wiper blade provides good spring force on the windshield and do not have any arched springs to ice up. This type of blade, sold under many different brand names, work great during the winter.

Installing wiper blades is the simplest thing, and take literally less than a minute to do. At the junction of the wiper arm and the blade there is a small tab. Simple depress the tab and slide the old blade off. The new blade slides on and clicks into place.
Prolonging blade life. Often times at a ski resort parking lot, you will notice cars with their wiper blades flipped in the up position. Why do people do this? The reason is so that the blades do not freeze to the windshield and rip off when you engage your wiper. As the car is driven it heats the cab and the windshield up. After parking the car, and especially if it is snowing, the first bits of snow to contact the warm car melts. As time progresses and the car freezes the melted snow becomes ice and bonds your wiper blades to the windshield.
Wiper blades they are one of those things that seem so trivial unit you really need them to work. That is why it is standard equipment on ALL cars!

Monday, December 7, 2009

Cutting Firewood - The Easy Way

With the arrival of the cold temps I really appreciate having a warm raging fire burning in my wood burning insert. However I spend alot of my time during the non-snowy months harvesting firewood. Maybe I just need to get myself one of these.


Friday, December 4, 2009

The Bounty of Thanksgiving


Home for Thanksgiving is always so pleasant. Ripe back yard fruit. Plenty of food. Family. Warm weather. Though I love living where I do, a trip to southern California is always a welcome in winter.

Thursday, December 3, 2009

Pizza Night II - Trader Joe's Pizza Dough


A few nights ago I finally tried the fabled Traders Joe's Pizza Dough. Not having a TJ's in town makes their products slightly elusive. I have heard good things about their dough and was eager to try it out.

Of the several doughs I have tired this is the best!! It even beats my mother in laws home made dough. shhhhh don't tell her, I don't think she reads my blog either.


Available in three varieties: Regular, Whole Wheat, and Garlic and Herb. We sampled the WW and GH. I was most impressed with the WW, though I prefer the GH, the WW did not taste like cardboard; something I think most WW products taste like.
Muumm Muummm Pizza!!


Tuesday, December 1, 2009

Changing a Car Tire - Part 1

It was late in the afternoon on Thanksgiving Thursday, and I get a phone call. "I'll be a little late, I have a flat tire" I hear the voice of my cousin say on the other end of the line. This last week as I was swapping out winter tires (no I did not get Trax for my car), it occurred to me that the simple task of changing out a tire is not always so simple, and to some daunting and impossible. The most common responds I hear from people that do not know how to change a tire is: that is what cell phones and AAA is for. Cell phones don't always work, and it can take up to two hours for a AAA service call to finally reach you. Having a flat tire and not being able to change it out is like shitting your pants cause your shoelaces were not tied and therefor you couldn't walk to the bathroom. Ridiculous; exactly.

I figure I would layout some tire changing tips. With the proper technique anyone can do it; it does not matter how strong you are. I will break up this into two parts. Part one is how to change a flat tire on the roadside. Step two is how to change your tires quickly in the garage. This second part especially pertains to changing out all four tires or rotating your tires.
Preparation-At some point you should make sure you have everything needed to change out a flat tire stored in you car. Only three basic items are needed: jack, lug wrench, and a spare tire. When checking you should make sure that the spare is inflated properly. Other items that you might need are hub cap removal tool, lock lug nut "keys", wheel chocks, hazard single (flares or reflective triangles).

Lug Nut Removal-This should be the first step. With the vehicle parked on a level surface, the lug nuts should be "broken" when the car is still on the ground. Broken refers to loosening the nut but not removed. It is much safer to do so with the car on the ground as oppose to being in the air. Things that might cause difficulty: Hub caps. Some wheels have a hub cap that need to be removed before you can access the lug nuts. Don't be fooled by the fake lug nuts on the hub cap. Most caps can be pried off, some require a key or a hex tool to remove (take care of this in the prep). Some lug nuts are keyed for security reasons. Make sure to have the key. Finally lug nuts might be torque enough that will make it difficult to remove. A LN is suppose to be torqued to less that 100 ft/lbs. A stock lug wrench is typically more than a foot long, and the average human is more than 100 pounds. Thus if you stand on the end of the wrench you can most likely break it free. Remember to make sure the wrench is properly seated on the nut. Really it is so easy even a kid can do it, though the wrench handle should be on the left side of the nut for removal, the kid in the picture surely is tightening the nut.


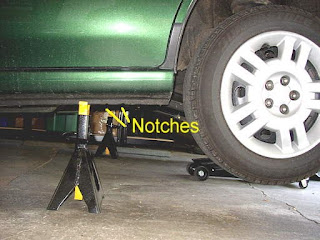
Jacking-The next step is jacking up the car. Each manufacture supplies their cars with their own jack and jacking location. Part of the prep work is to know where on the car to jack. These locations are different between makes and models. Most cars seem to jack on the pinch weld at a location designated by a notch. German cars often have a jacking port, and solid rear axle trucks typically jack on the axle itself in the rear. Prior to jacking make sure the car is parked on a level surface, and set the parking break. For added security, place a wheel chock or large rock/piece of wood against the wheel opposite the corner being jacked up.

Lug Nuts-Now that the flat tire is in the air, and the lug nuts are loose, the next step is to remove the lug nuts and then the wheel. The term lug nut is generic. Some cars (Audi's) have lug bolts. Their function is the same. The thing to remember is not to lose any. Lug nuts/bolts are very easy to lose working on the side of the road in the dark.

Removing Wheels- Most of the time the wheels just come off. However sometimes a wheel could be stuck. Some wheels are known as hubcentrics, meaning that the wheel rest on the hub and sometimes they are stuck on. A good jerk will often times free the wheel from the hub. Sometimes however not. A whack with a large sledge hammer will almost always work. But often you do not have a hammer when stuck with a flat on the side of the road. A kick with the heel of your foot is the final option. Be aware that kicking the tire could cause the car to fall off it's jack. Locate your body so that the car will not crush you when it falls, and block off extra wheels and tires for added security. You can even place large solid objects under the car which are larger than you so that the object takes the weight of the fallen car.

Installing Wheels- This could be the hardest part of the job. Wheels and tires are heavy. Roll the wheel in place. Line up the studs with the holes in the wheels, this is the most important part. Rotate the wheel so the holes are properly orientated. I use two different lifting techniques. One is to put your leg against the tire. Hold the top of the tire and lift and roll the tire onto your leg then slide back onto the studs. The other way is the squat in front of the wheel. Grab the lower portion of the wheel and rest your forearms on the inside of your knees and shin. Using your calf muscle lift the heel of your foot of the ground, your forearms and the wheel. Line up the holes on the wheel with the studs and push the wheel towards the car. Once the wheel is hung on the studs, thread a lug nut on. Cars with lug bolts come with a thread blank, a bolt with no head. Thread this onto the hub to act as a stud to "hang" the wheel on.

Tightening Lug Nuts-Once you get that first lug nut you should tighten the lug nut all the way. The important thing here is to make sure the wheel sits flush against the hub. Push the wheel back as you tighten. You do not want the wheel to be cocked on the studs. Once that first lug nut is in place the plenty of stud thread should be exposed to easily engage the rest of the lug nut. Snug all the nuts in place. Lower the car off the jack. The final step is to torque the lug nuts. Torque should be done with the car on the ground. Most lug nuts are speced to be tightened between 80-100 foot pounds. A foot long wrench handle and 100 pounds will generate 100ft/lbs. So if your lug wrench is 16 inches and you weight 150lbs. A little more than half your weight on the end of the wrench will suffice. You should also tighten the lug nuts in a cris cross pattern to ensure the wheel is seated properly. Then go back and re-torque the first and 2nd lug nut.

And just like that, you are rolling down the highway again on your way to stuff your face full of Turkey and mash potatoes.

Update: I got into a debate last night on whether it is proper to tighten the first lug nut all the way, or if all the lug nuts should be threaded on prior to them being tightened. First off tightened is different then torqued. The idea that all the LNs should be installed then tightened in a criss cross pattern is to insure that the wheel sits on the hub flush, however it does not guarantee this. You can easily tighten the first LN and have the wheel cocked sideways on the studs and then only when the second LN is tighten pull the wheel flush. Doing it this way might bend the wheel or jam the wheel against the studs and still be crocked. Tightening the first LN and taking extra care to make sure the wheel sits flush has a few benefits. You can make sure the wheel is flush because you can see the length of stud exposed in the wheel holes without the rest of the LN in place, and insure that they are equal length. Once the wheel is set you don't have to worry about it and just drive the rest of the LNs home. Some wheels have very deep LN holes and it is difficult to start the LN on the threads of the studs. The greatest benefit I find is that with the wheel seated all the way, is that you have the maximum amount of thread exposed to work with.